Designing simple RL-trained pong agents to play against each other

UnityML: Twisted Pong
This was a learning assignment I created for Dartmouth College's game development course.
Introduction
We have so far been building game bots with planned-out mechanics and predictable behaviors. When crafted meticulously, they can appear realistic and challenge players. However, they take a long time to develop and can involve very complex logic. Unity recently launched its own machine learning platform enabling game developers to train and use bots whose behaviors are discovered through reinforcement learning. Let's build some smarter bots in a fun game of twisted pong.
Goal Overview ✅
- [ ] Get comfortable with the UnityML development environment
- [ ] Understand what makes good training data and environments
- [ ] Iterate on feature engineering / heuristic design to improve AI performance
- [ ] Build a relatively clever bot that accomplishes some cool task!
Some Setup 🏗
First, create a new blank 2D Unity project.
The UnityML framework is composed of the com.unity.ml-agents package along with the mlagents Python library built on top of Tensorflow. The library provides various method ranging from classic reinforcement learning to imitation learning to neuroevolution, bundled with a CLI to manage the training process.
Installing the Unity Package 📦
In your new Unity project, navigate to Window => Package Manager, and then in the top menu bar click Advanced and then select Show preview packages.
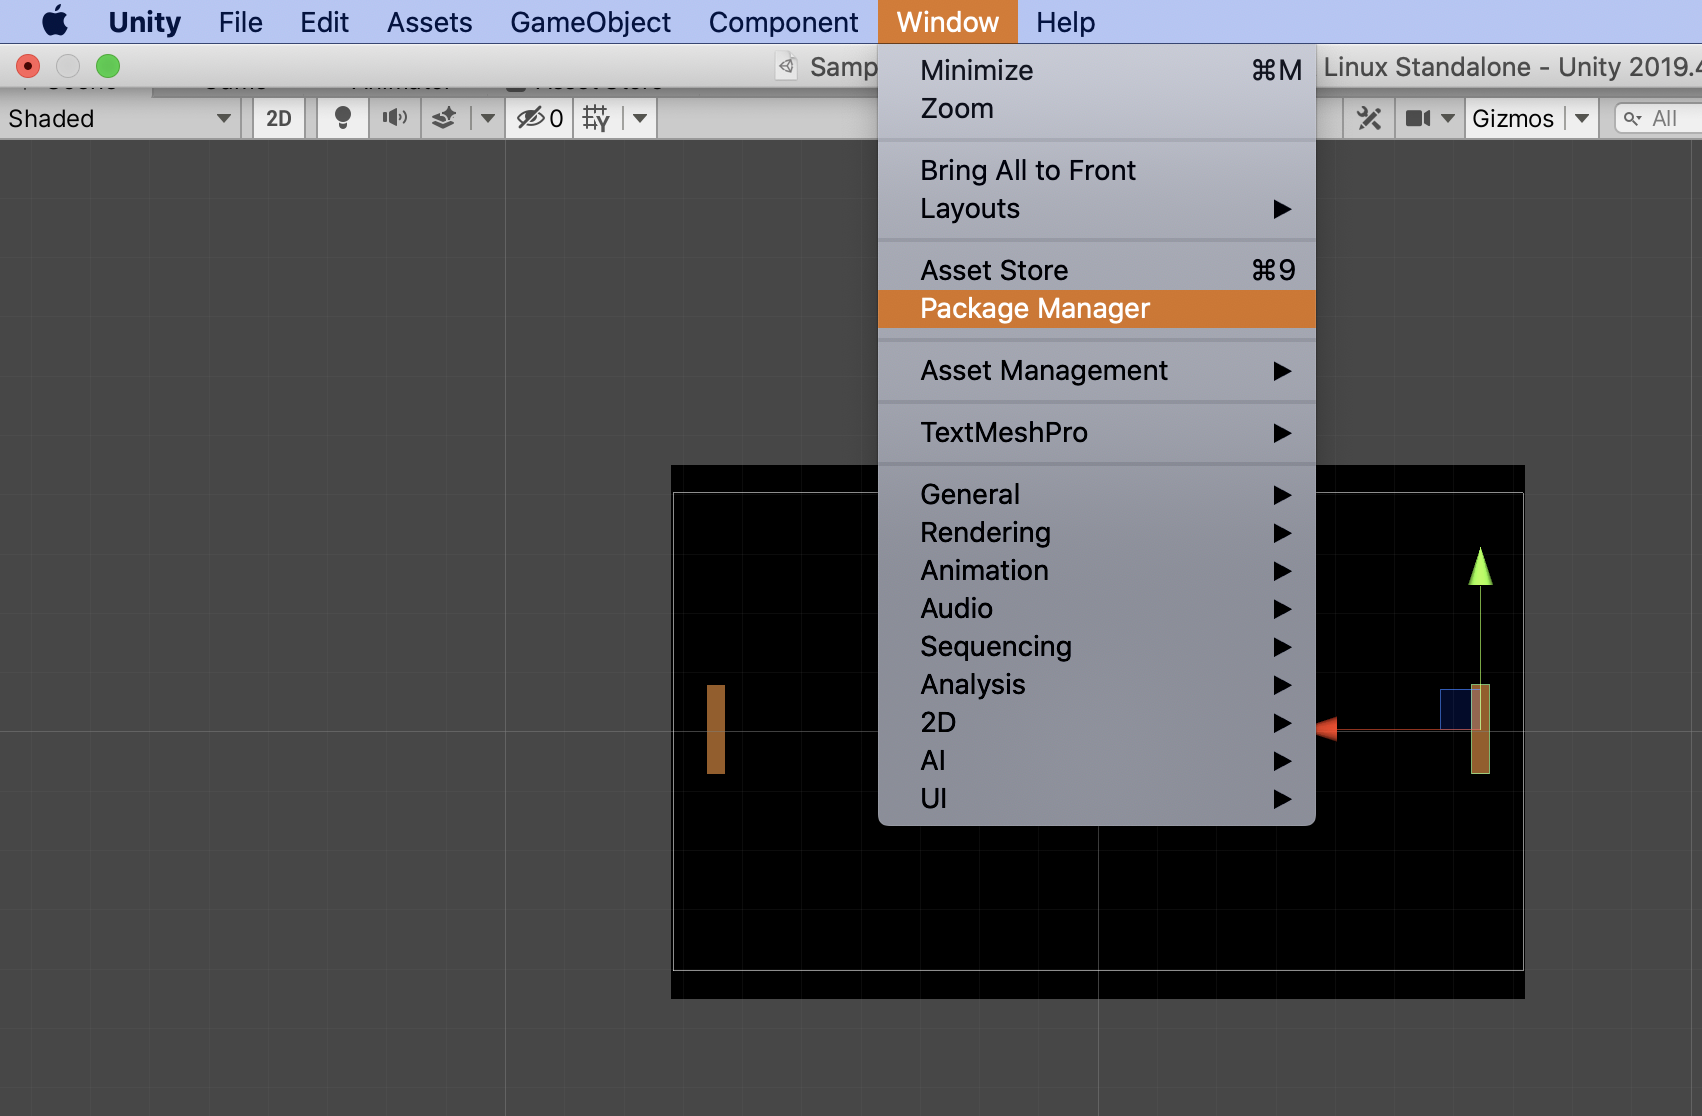
Switch from My assets to All packages. Search for "ml agents" in the search bar, and then click download and import.
Installing Python and mlagents
The game world and its agents are still built in the Unity Editor, but the training process is executed outside in a Python environment. Hence, you'll need python 3.6.1+ in your local development environment.
If you're lazy, feel free to simply run pip install mlagents and this will add this package to your root Python installation. If you'd like to stay organized, create a virtual environment that installs this package only for this Python project:
- Navigate to a directory where you'd like to store this environment and package. Usually, it's best to either have a central location for all your Python virtual environments, or put them close to the project directory.
$ python -m venv <name of this environment>$ source <current directory>/<name of this environment>/bin/activate- Now you should see a small
(name of this environment)to the left of your terminal line. $ pip install mlagents- this will only install the package to this environment.- To stop using this environment (if you want to switch to a different Python project), run
deactivate. - When you work on this project later, you'll have to do the
sourcestep to activate the environment again.
Building the Pong Board
For now, we can forget about machine learning. We first need to build out our game environment, complete with player controllers, scoring systems, and any creative flair you wish to add.
Designing Game Logic 🎲
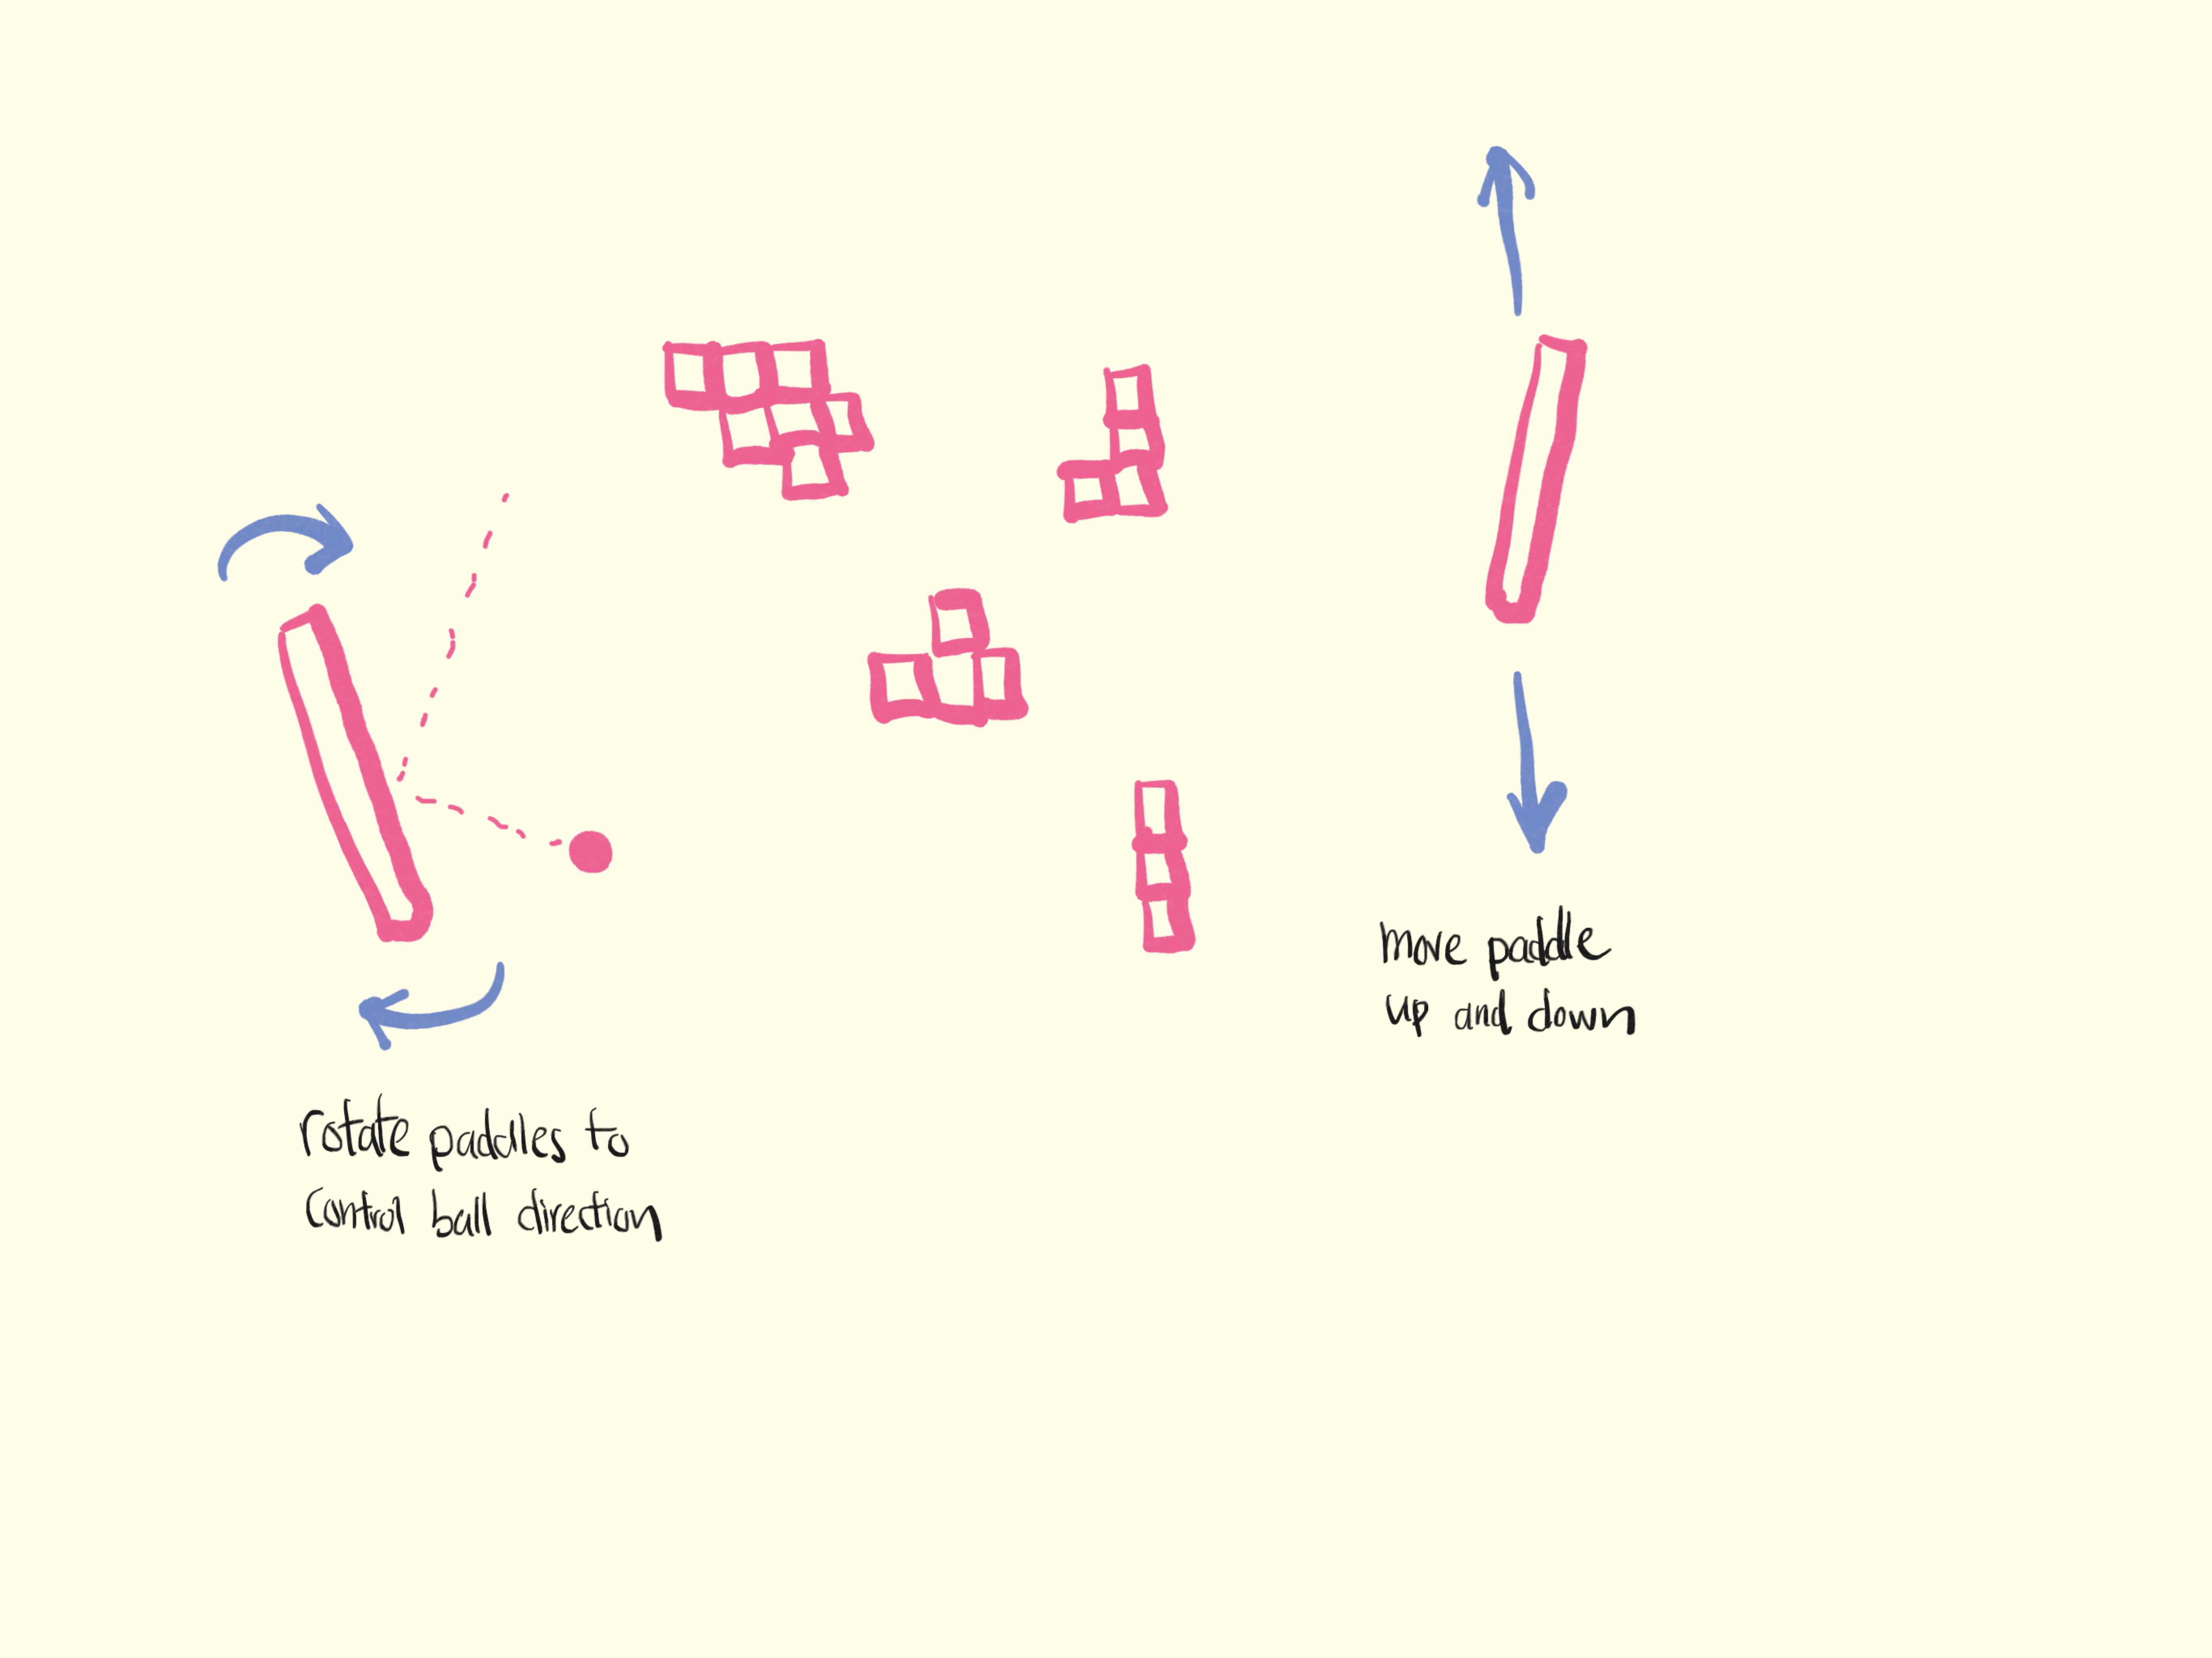
We offer you a simple set of game mechanics in this version of twisted pong. It's intended to be fairly simple to implement while providing enough "learning space" to observe the AI's prowess. Here's how it works:
- Same old pong back-n-forth.
- You can rotate your paddle to any degree at any time, therefore giving the player control over which direction the ball goes.
- There are some bricks (like in brick smasher) in the middle.
Here's an accompanying diagram to help visualize these mechanics:
Your Creative Touch 🎨
You are more than welcome (in fact, encouraged) to add on additional game mechanics to spice things up. For example, maybe have the ball speed change when it hits a brick? Or maybe have unbreakable, obstacles in the middle which the ball can bounce off of in random directions. Add more than one ball? The world is your oyster.
Thinking Like a Machine 🧠
Whatever your ultimate game design is, you do want to keep the machine in mind. We chose these game mechanics because it can show off an AI's ability to:
- Observe and consider environmental factors such as the ball movement and brick obstacles
- Gain rewards and receive punishment when the ball is hit or missed
- Make gradual changes to the environment (smashing bricks) and forming longtime strategies
Paddle and Ball Physics 🎱
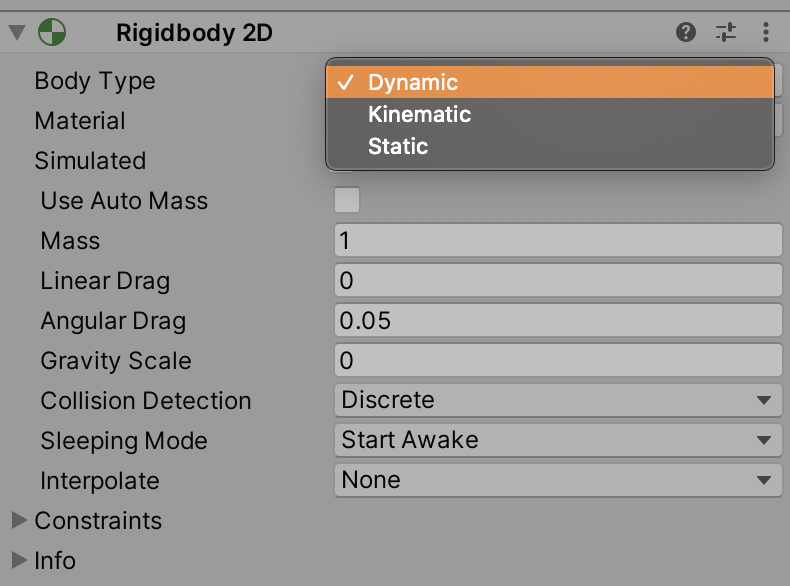
The 2D physics system is rather simple. We want Rigidbody2D components for both our paddles and ball. In addition, we should add colliders - a CircleCollider2D component for the ball and BoxCollider2D component for the paddles. You also want to contain the ball within a rectangular region. Create an Arena GameObject that spans the game board, and add two BoxCollider2D components on the top and bottom edges of the board.
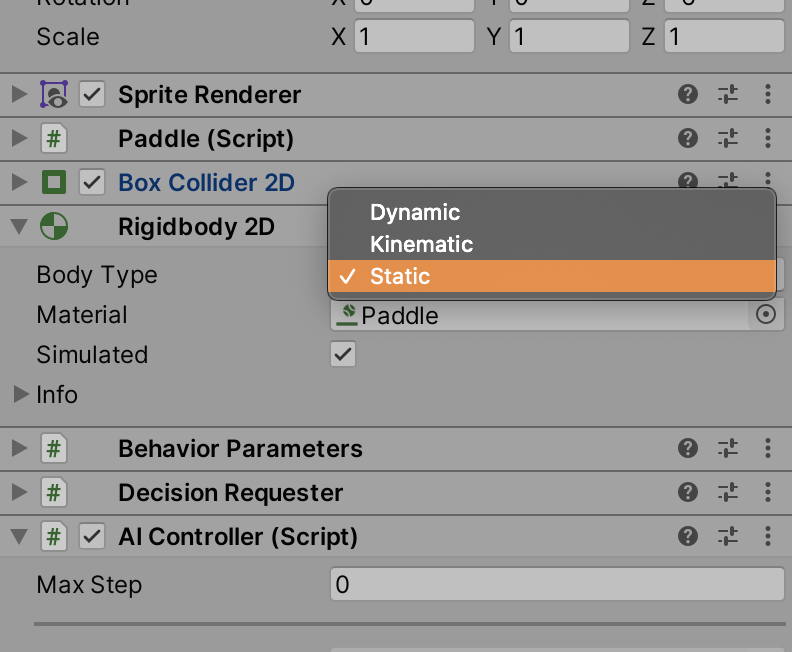
We want the ball do be a dynamic rigid body, while the paddles are static. This ensures that during collisions, the paddles do not move.
We desire the ball to bounce off from the paddle and arena borders. Let's create a simple PhysicsMaterial2D asset with bounciness = 1 and friction = 0.4. Apply this material to the ball, paddles, and arena colliders.
Game Mechanics ⚙️
The rules for the game are quite simple. All of the following game logic should be built in a dedicated GameComponent, which should be wired up with the ball, paddles, and arena.
On start, it is suggested to give the ball an initial push in a random direction when a game starts so that each game feels different.
Show me way to generate a random starting force
// generates a force vector with horizontal component in range [6f, 7f] and vertical component in range [0.6f, 0.9f], scaled with a FORCE_SCALE = 60f
GetComponent<Rigidbody2D>().AddForce(new Vector2(Random.Range(6f, 7f) * (Random.value < 0.5f ? 1 : -1), Random.Range(0.6f, 0.9f) * (Random.value < 0.5f ? 1 : -1)) * FORCE_SCALE);
Scoring
The volley continues until the first player is able to hit it over the goal line of their opponent, which can be defined as the East and West edges of the game board. It is best to log the score and reset the game the moment the ball passes over the goal line. One method of detecting a scoring hit is to create two GameObjects at the East and West ends of the game board, and checking whether or not the ball's transform.position.x has surpassed these checkpoints' transform.position.x.
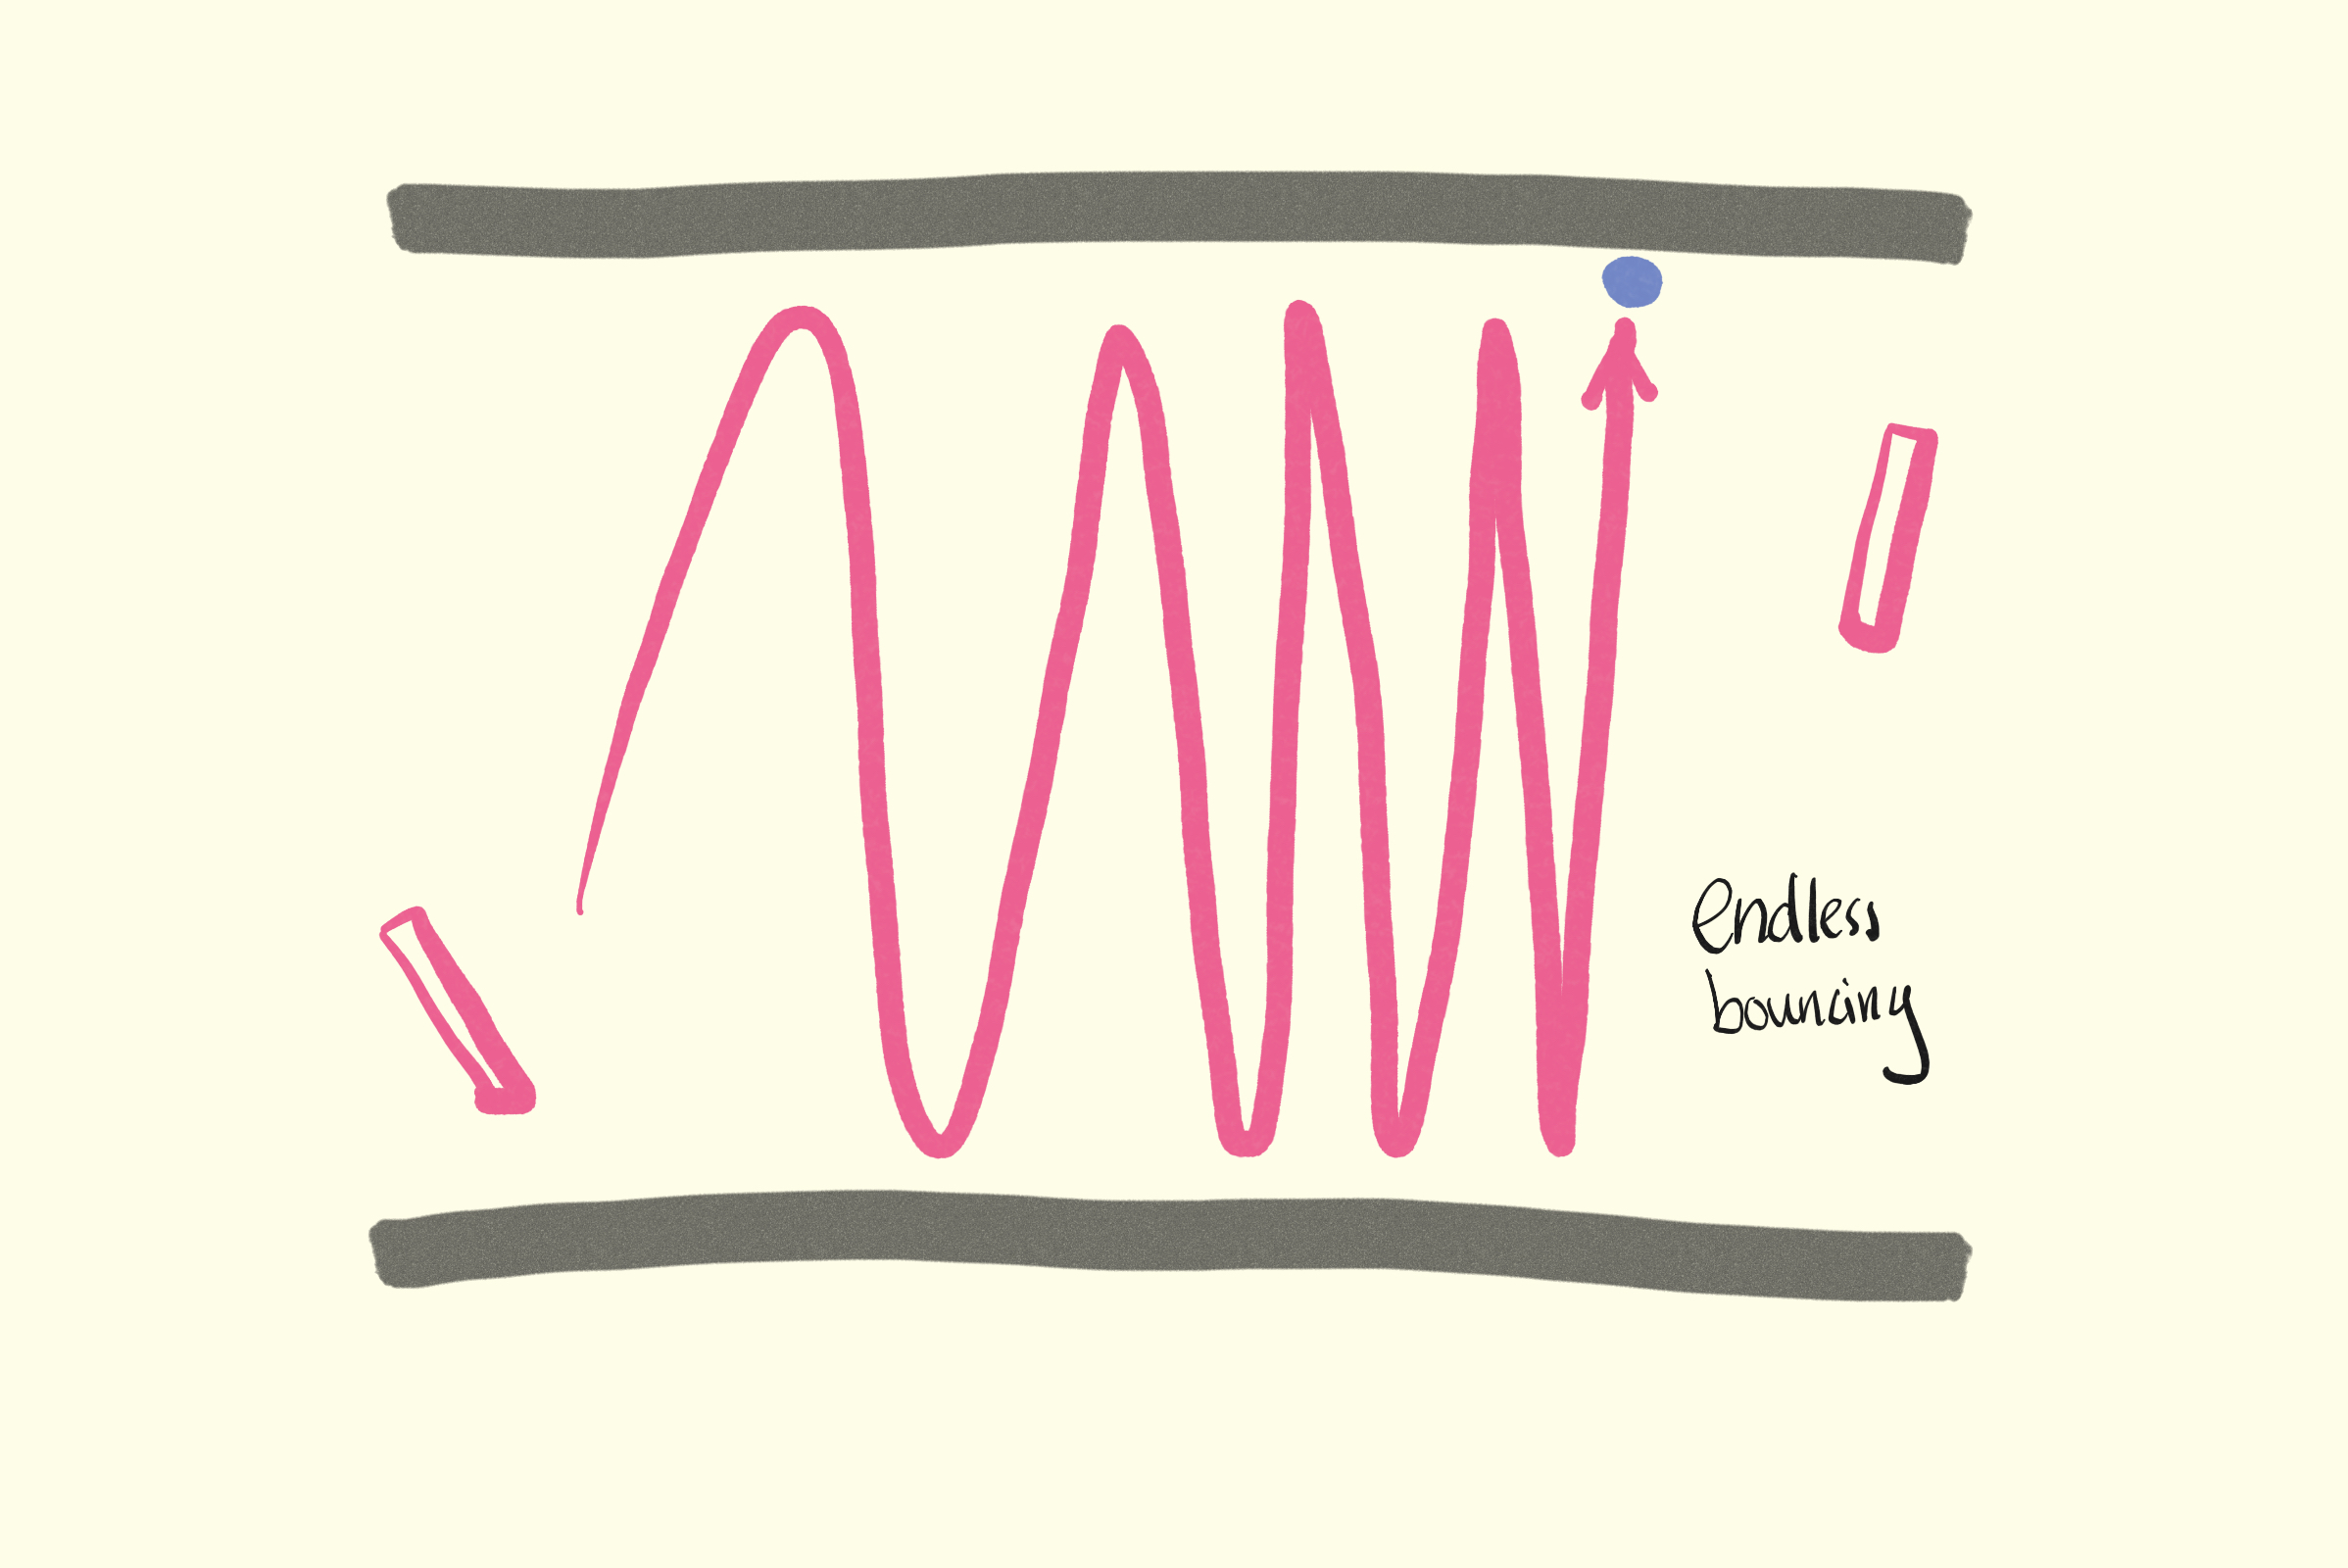
Avoid Getting Stuck
There will often arise a scenario where the ball begins bouncing endlessly up and down between the arena's North and South boundaries. This happens when any player hits the ball at a steep vertical angle. You will want to handle this situation gracefully by resetting the game if this happens.
Designing Agents 🤖
First — Reinforcement Learning 📚
It would take more than a textbook to give a full treatment for the topic of reinforcement learning. The goal of this assignment is not to uncover the theory behind RL, but rather simply admire its powers. Thus, a short introduction would suffice.
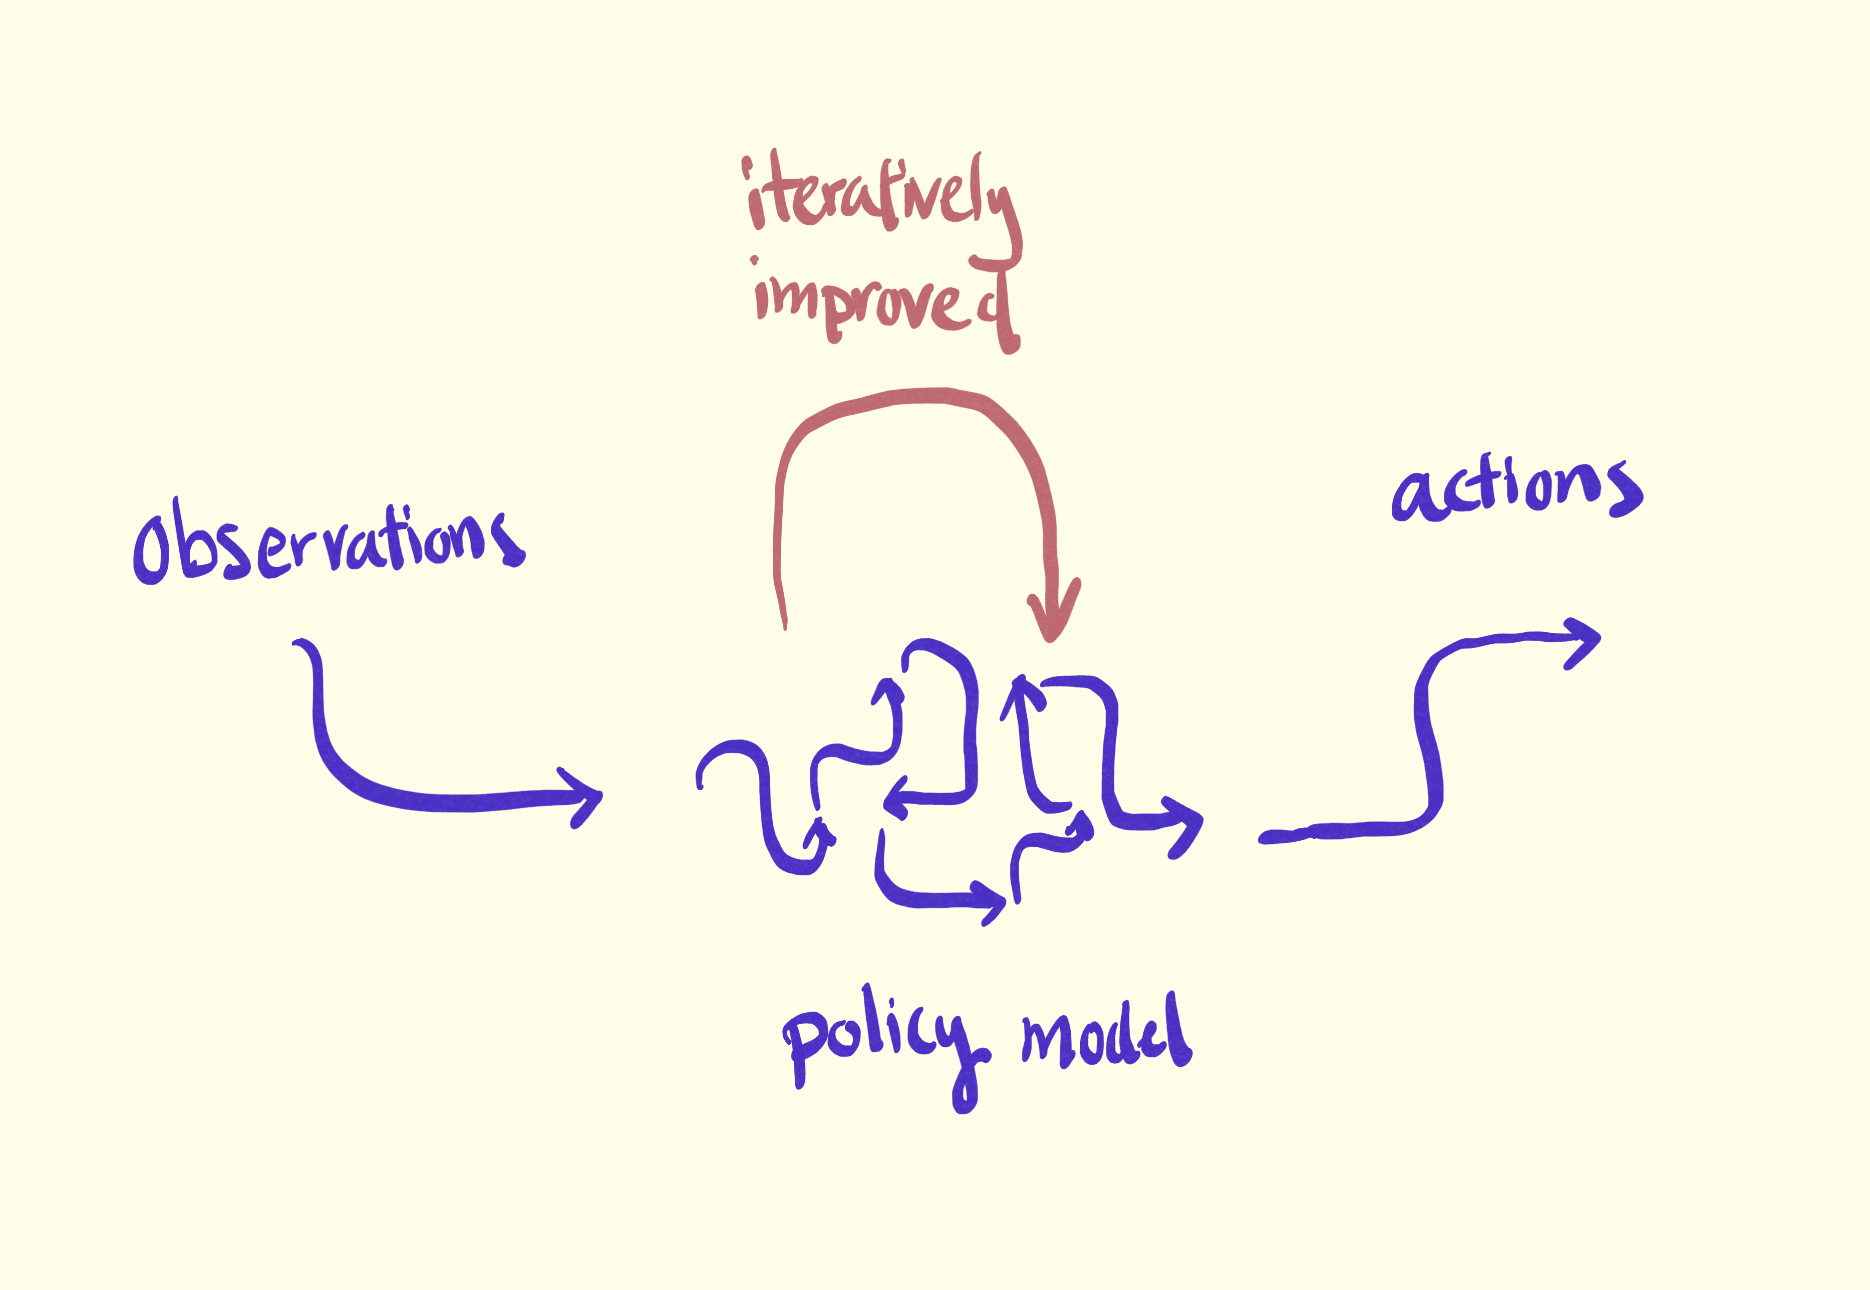
Reinforcement learning discovers the best ways to transform a set of environmental observations to action policies that yield the most rewards. RL agents absorb all forms of sensory input data and experiment on different ways to take actions to respond to the environment. This process is called the policy iteration, through which the agent aims to discover the optimal policy based on incrementing on a value function.
Agent Structure
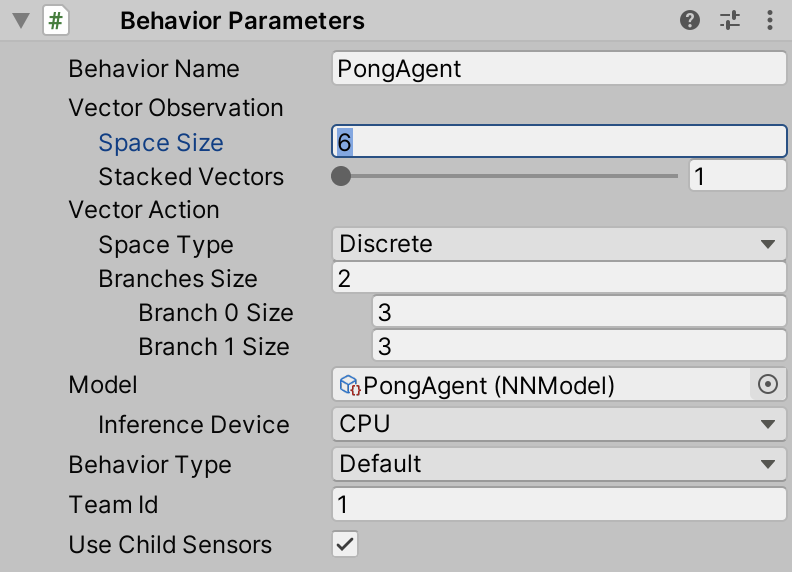
Now it's time to build our smart AI agents. Create a PongAgent.cs script and add it to the each of the paddles. Also add the BehaviorParameters.cs and DecisionRequester.cs scripts provided by the com.unity.ml-agents package, which are APIs to connect this GameObject with trained .nn models.
Scaffold your PongAgent.cs script so that it is a class that implements the Agent C# interface.
using UnityEngine;
using Unity.MLAgents;
using Unity.MLAgents.Sensors;

class PongAgent : Agent
{
	public override void OnEpisodeBegin() {}
	public override void CollectObservations(VectorSensor sensor) {}
	public override void OnActionReceived(float[] vectorAction) {}
	public override void Heuristic(float[] actionsOut) {}
}
The two critical functions that dictate how this agent observes and interacts with its world are CollectObservations and OnActionReceived.
Observations 👀
How your agent observes the world is critical for its performance. It's up to you to ultimately decide what environmental data to feed into the model. We suggest the basic set:
- Ball position
- Ball velocity
- Own paddle position
- Own paddle rotation
You can add other features such as opponent's paddle position and rotation or current scoreboard. Be attentive of how these additional information can shape what the model optimizes for. For example, if the agent can observe the opponent's paddle positioning, it may learn strategies to hit the ball away from the opponent to increase the chance of scoring.
Once you've decided on your observation data, take a look at the CollectObservations function. Here, all input data must be channeled through the VectorSensor object, which ultimately is just a vector (array of floats) which you can inject data into.
For example, in order to add the ball position as input data, you would add the line:
sensor.AddObservation(ball.transform.position); // appends 3 values to this tensor that represents the ball's instantaneous position
Add all the observation data you wish to this model. Once you have done that, calculate the size of the final sensor (how many numerical values you injected) and this will be the size of your observation input. Note that if you inject a Vector3 object into the sensor, this is equivalent to appending three numerical values. If you inject a Quaternion, this is equivalent to appending four numerical values. Take the sum and configure the vector observation's space size to be that number. In the basic example design listed above, we inject six numbers.
Perspective Matters
The most important factor to keep in mind is perspective. An agent who trains well to play twisted pong on the right side of the board will utterly fail if transitioned to the left side. This is because all of the observational data becomes inverted. Imagine being used to driving a car on the right side of the road and suddenly switching over to the left side.
Hence, ensure that the input data you feed into the reinforcement learning model is adjusted for perspective. It is advisable to choose one side of the board to always digest adjusted data, while the other side just digests the original data. One way of adjusting the data is to apply a negation to position or velocity-based measurements.
Relative Position 📌
This is particularly important to keep in mind when observing the ball's position. For example, instead of observing the ball's absolute transform.position, you can instead pass in the ball's position relative to the paddle's centroid. It is then also important to correctly negate this relative position vector for the agent on one side of the board.
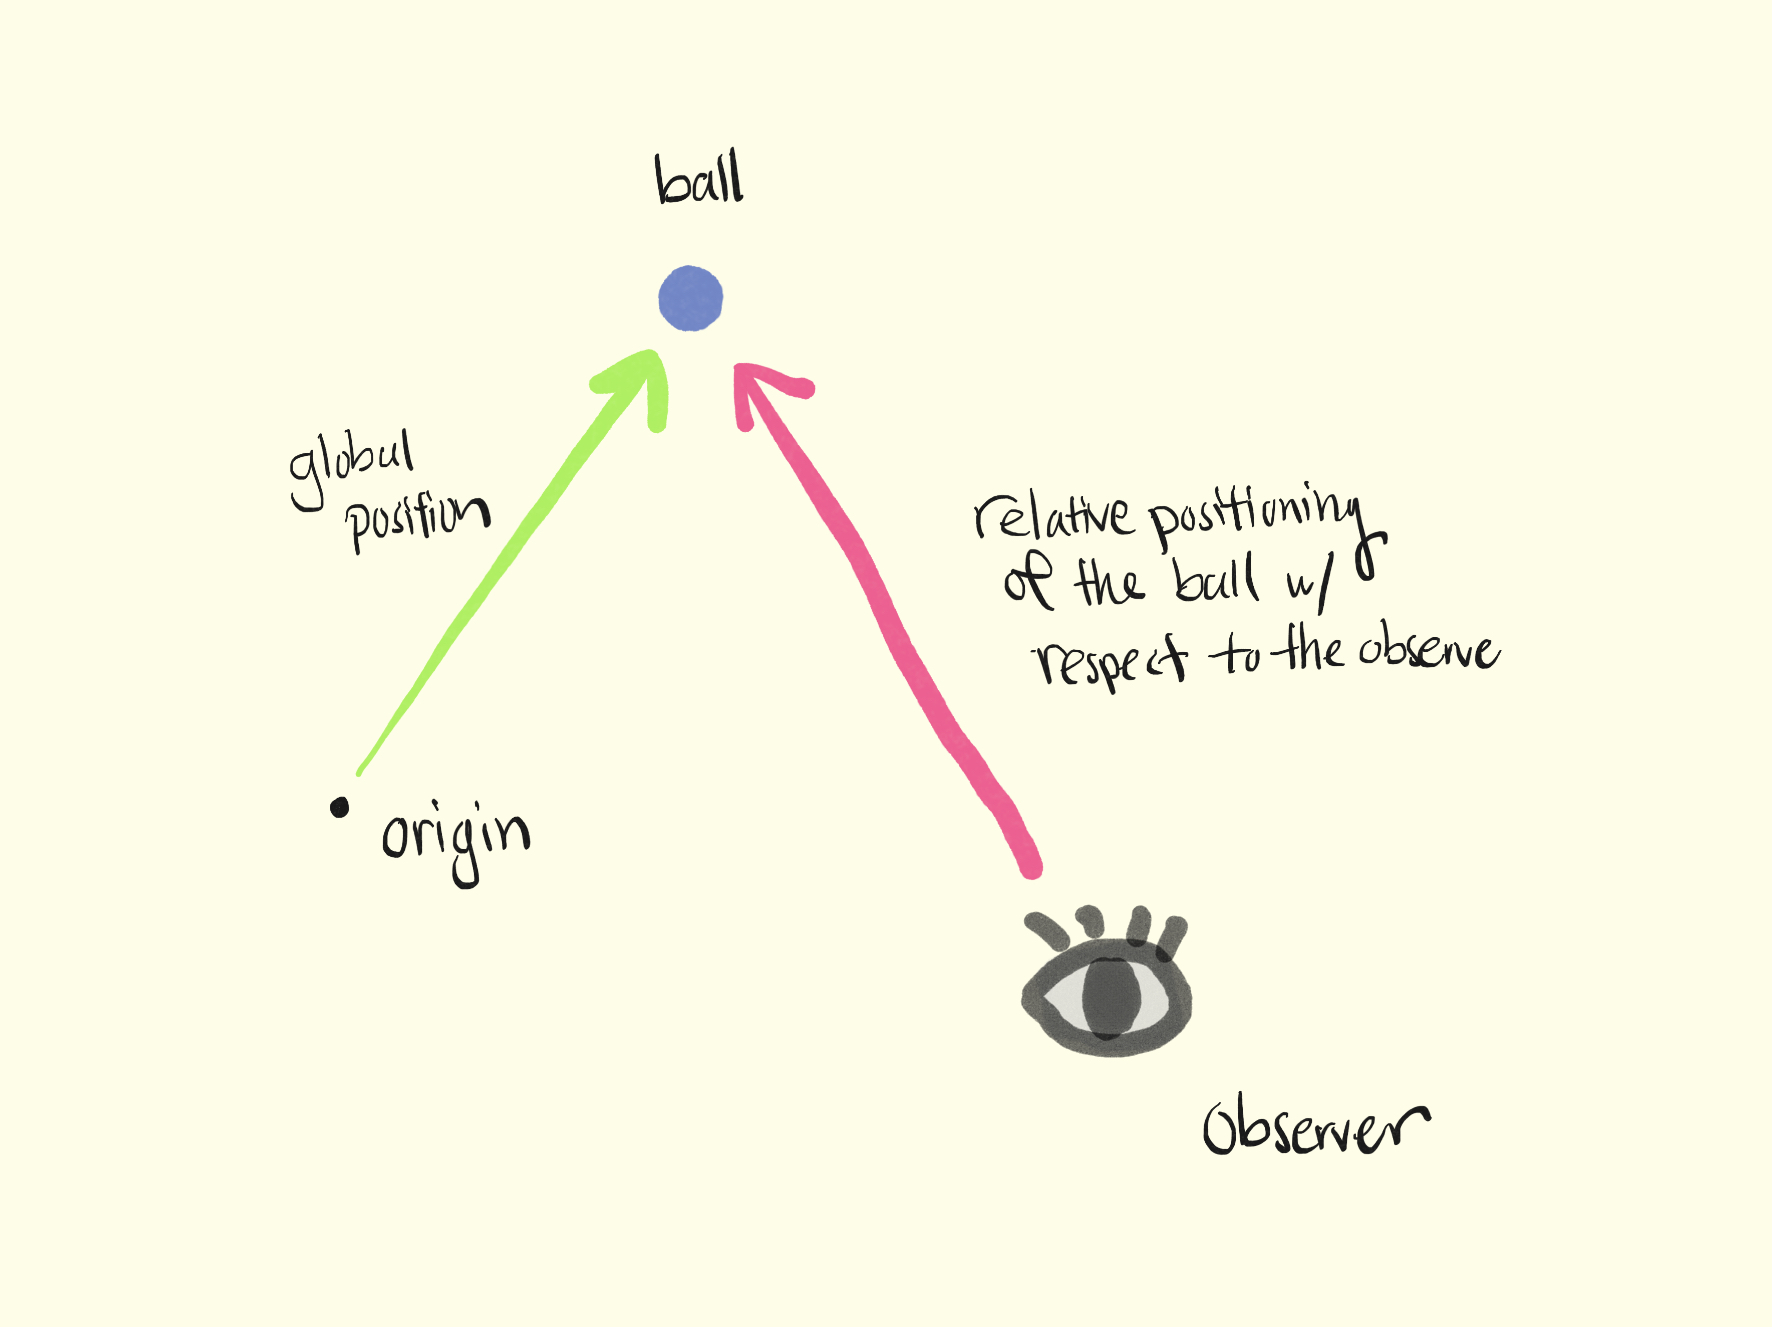
Relative Velocity 🏎
Likewise, the ball's velocity should also be viewed with perspective. While velocity inherently carries information about direction (unlike absolute position), you will still need to correctly negative the velocity for the agent on one side of the board.
Agent Actions 🥊
Now that our agent is able to see the world, it will start to output actions in response to it. The agent interacts with the world via an output action vector of a size you can define. This vector essentially contains a list of numerical values generated by the agent, and these values can be mapped to mechanics such as agent movement, attack, decisions, etc.
This version of pong should only allow players to move and rotate the paddle. Therefore, at each decision step, the agent should decide whether to move up, down, or stay still, and whether to rotate clockwise, counterclockwise, or stay still.
Within UnityML's framework, there are two main ways agents interact with the world: continuous versus discrete interactions.
- Examples of continuous interactions:
- How fast a car agent drives down the road
- How hard a soccer agent kicks the ball
- Examples of discrete interactions:
- A humanoid agent deciding whether or not to jump
- A dog agent deciding whether or not to eat
In our case, we want our pong agent to decide whether or not to rotate or move the paddle vertically. We do not want the agent to control the magnitude of the movement, but simply rather whether or not to move at a given decision step. This matches how you might play the game. For example, at each moment, you decide whether or not to press the up arrow key to move the paddle or the right arrow to rotate the paddle. Since this is a discrete decision with preset choices, it is best achieved through a discrete action vector.
First, in the BehaviorParameters component of your paddles, set the SpaceType to be Discrete with BranchesSize = 2. This creates two branches for our action vector, one to represent vertical movement and one for rotational. For both branches, set the size to be 3, which covers the following cases: no movement, positive movement, negative movement.

Now that we have configured our action vector to appropriately interact with the environment, we write code to map the vectorAction to functions that actually handle paddle movement. In OnActionReceived, complete the following cases:
public override void OnActionReceived(float[] vectorAction) {

	int verticalMovement = Mathf.FloorToInt(vectorAction[0]); // either 0, 1, or 2
	int rotation = Mathf.FloorToInt(vectorAction[1]); // either 0, 1, or 2

	switch (verticalMovement)
	  {
			case 0:
				// do nothing
				break;
			case 1:
				// move the paddle up
				break;
			case 2:
				// move the paddle down
				break;
		}
		switch (rotation)
    {
			case 0:
				// do nothing
				break;
			case 1:
				// if team A, rotate the paddle clockwise else counter-clockwise
				break;
			case 2:
				// if team A, rotate the paddle clockwise, else counter-clockwise
				break;
		}
}
Perspective Matters, Again
Here again, you will want to keep perspective in mind. If you have configured the observational data correctly, a ball speeding towards an agent's paddle will yield the same observational data regardless of which side the paddle is on. Hence, the agent will output the same equivalent action. However, rotating the paddle as the left paddle yields the opposite effect if applied to the right paddle. Likewise for the paddle's vertical movement. Hence, you will want to also negate the output action vector.
Agent Rewards 💰
Your agent should now be observing the world and taking actions. For it to learn what it ought to do, we need to give it rewards for doings things well and punishments for doing things poorly. Within the Agent class which PongAgent extends, the AddReward function gives the agent a positive or negative float value reward that guides the policy optimization process.
The simplest reward is to award the scorer and punish the opponent upon a scoring event. In general, it is best to keep the sum of all rewards within an episode to be within [-1f, 1f] to not throw the learning process out of balance. Since a scoring event will end the episode with EndEpisode, it is safe to award the winner AddReward(1f) and punish the opponent with AddReward(-1f). Of course, these are values you can and should experiment with.
Scoring is Hard
When training first begins, scoring tends to be a rare and difficult event to capture. Therefore, it is often helpful to guide the agent towards discovering policies that promote scoring by giving supplemental rewards to taking actions that are conducive to scoring. One example is hitting the ball. If we offer the agent AddReward(0.5f) for hitting the ball, we are able to steer them towards making more and more physical contact with the ball, which naturally leads to more scoring.
Punishments
We observed an annoying behavior above wherein a player can get the ball 'stuck' by hitting it at a steep vertical angle. While well-implemented game mechanics should handle these scenarios well, we can in fact aim to prevent them in the first place by punishing agents that cause that behavior.
Training your Agents 🏋️♂️
Now that you have created the world and the game logic, you can begin training your agents in this game of twisted pong. Create a new directory called Training within your project's Assets folder. Create a file called config.yaml with the following configuration parameters:
behaviors:
  PongPaddle: # name of the behavior, ensure your agent's `BehaviorParameters` component has the same name
    trainer_type: ppo # proximal policy optimization method
    hyperparameters:
      batch_size: 64 # should be in magnitude of 10s for discrete agents
      buffer_size: 2048 # a larger number allows for more stable training updates
      learning_rate: 3.0e-4
      beta: 1.0e-2 # higher number increases the randomness of policies
      epsilon: 0.3 # higher number allows for greater divergence in policy evolution
      lambd: 0.95
      num_epoch: 3
      learning_rate_schedule: constant
    network_settings:
      normalize: false
      hidden_units: 128 # smaller size of the network layers is more efficient for simpler tasks like this paddle game
      num_layers: 1 # smaller number of layers is more efficient for simpler tasks like this paddle game
    reward_signals:
      extrinsic:
        strength: 1.0
        gamma: 0.99
      curiosity: # additional configurations to boost curiosity
        strength: 0.5 # a stronger curiosity strengthens rewards for policies driven by the intrinsic curiosity module
        gamma: 0.99
        encoding_size: 256
        learning_rate: 3.0e-4
    max_steps: 50000000
    time_horizon: 1000 # a larger horizontal allows the agent to capture a greater span of events
    summary_freq: 1000
    self_play:
      save_steps: 10000 # more steps yield opponents of more diverse play styles
      team_change: 40000 # more frequent team changes avoid overfitting to opponents
      swap_steps: 500
      play_against_latest_model_ratio: 0.5 # a smaller ratio tends to have more stable training
      window: 30 # a larger window allows playing against opponents of more diverse play styles
More on what these configurations do
If you are deeply curious about reinforcement learning and how to design the best learning agents, you can read more about each of these configurations below. UnityML's framework enables you to customize your model and training setup to high degrees.
Optimize Training Process
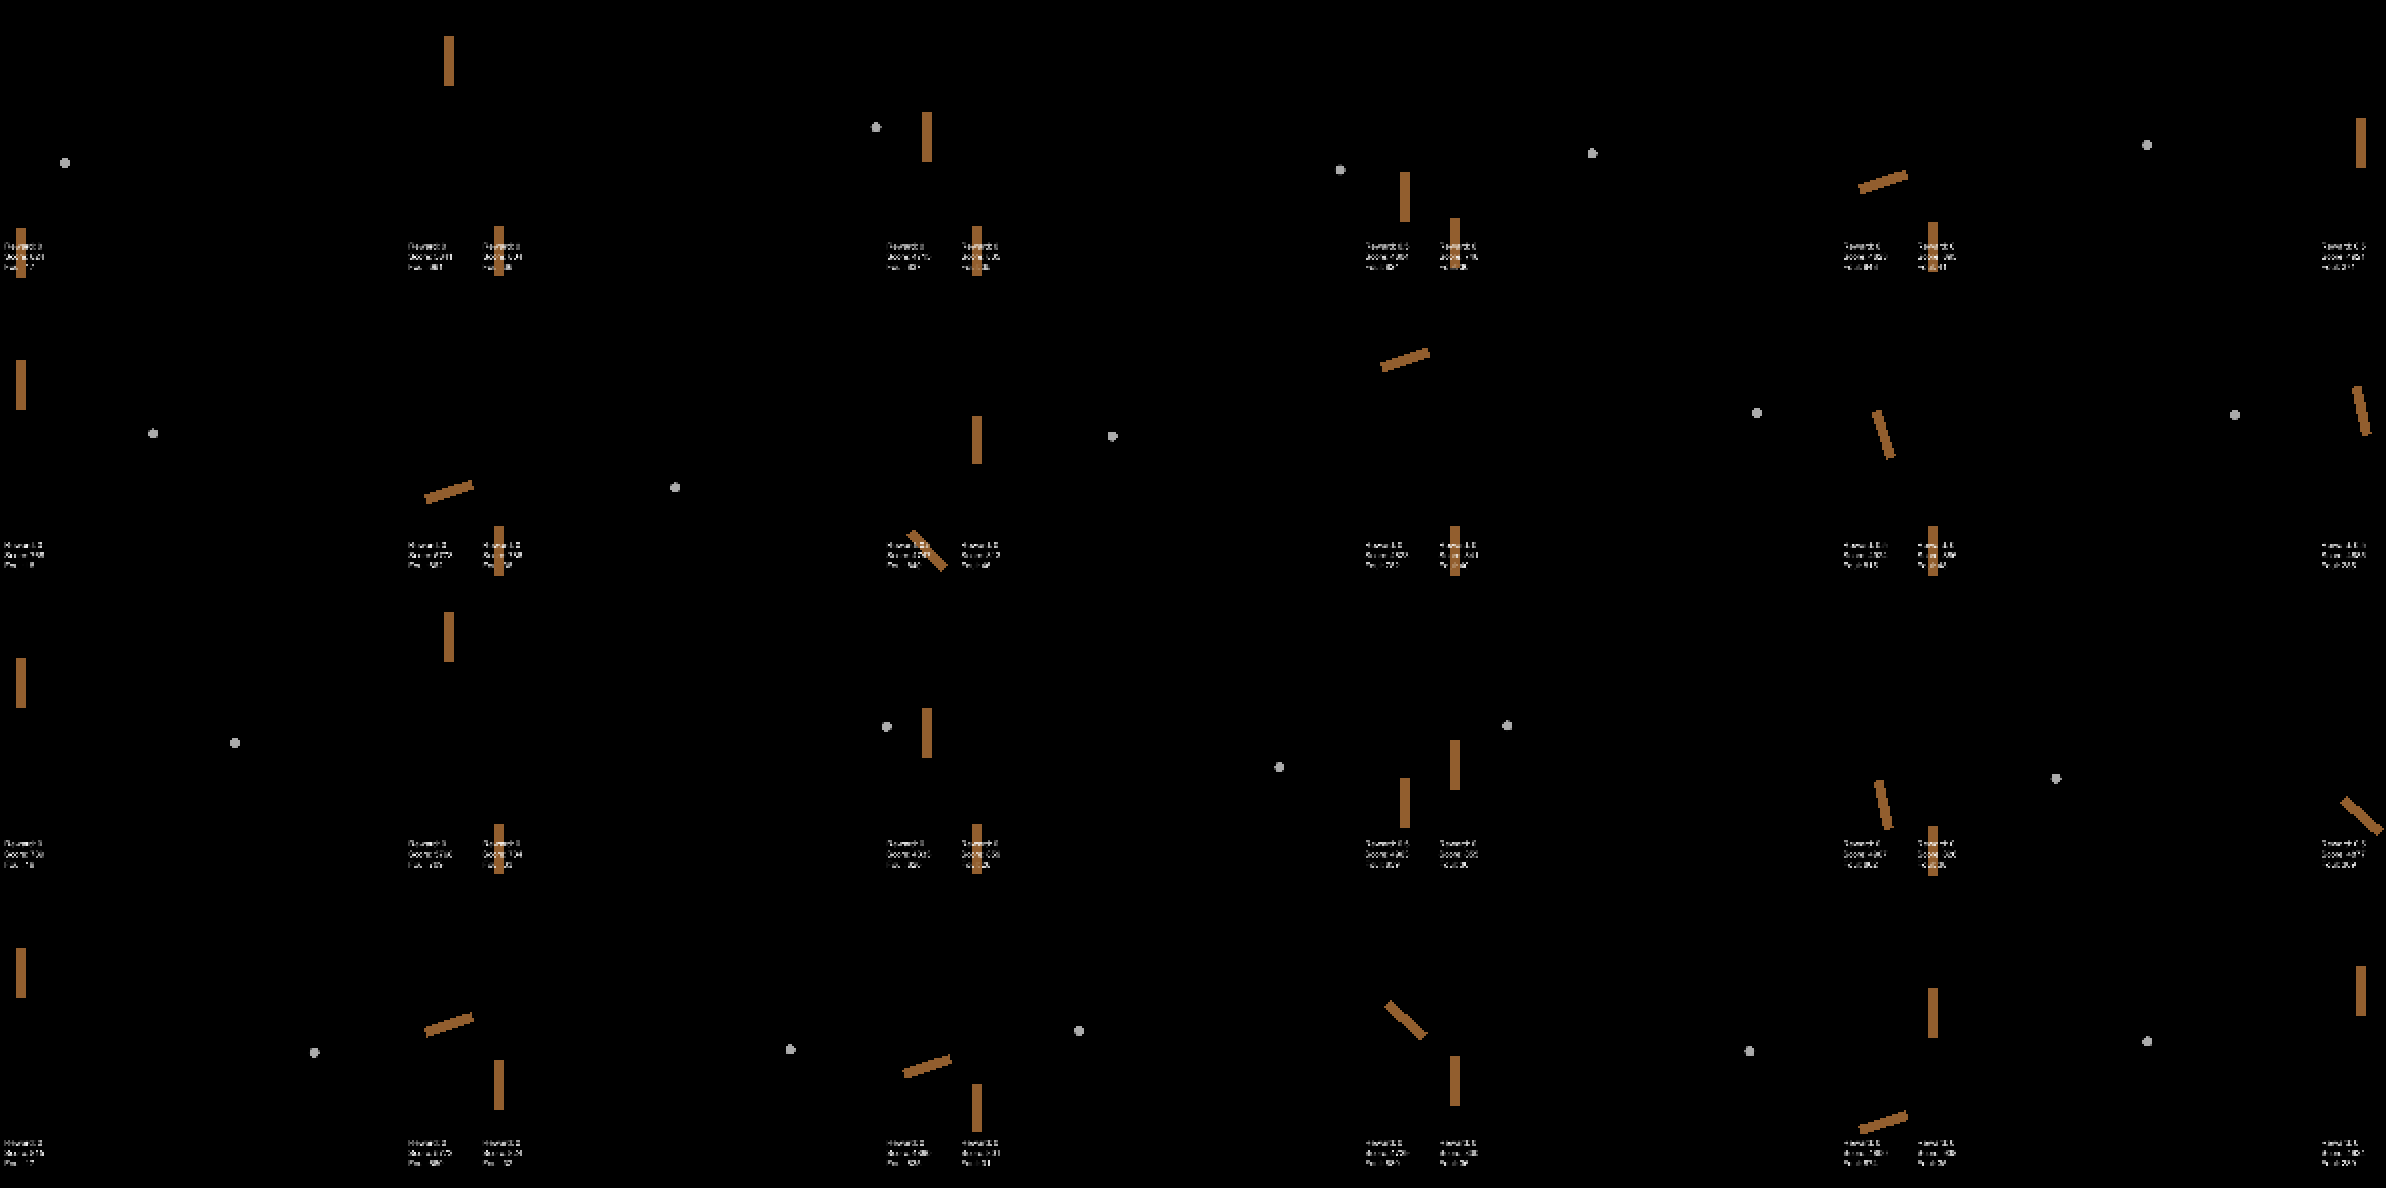
Currently, we only have one active game. UnityML framework's training process works for as many agents as there are in the scene. Therefore, if we instantiate multiple copies of this game arena, each with two agents, it can greatly speed up the training process. Make all of the necessary GameObjects for this game arena nested under a single parent (a good option is to use the overarching game controller as the parent), and transform it into a prefab that you can duplicate. In the end, your training grounds should look something like this:
How Much Training?
You should determine how much training you need to conduct by analyzing the change in the mean reward as the step count increases.
To Turn In 📝
- Your full
Assetsfolder withScriptsandTrainingfolders. - Make sure your
Trainingfolder contains at least one.nnmodel for demonstration, and yourconfig.yamlfile. - A screenshot of the final few lines of your training log before you hit
Ctrl + C. Be sure to include the text caused by theCtrl + C, as this is how we verify you have done the training yourself.
Extra Credit 🌟
- Effectively utilize additional observation data and demonstrate how that changes the model behavior.
- Implement the bricks feature.
- Tweak the model and training configurations to demonstrate an improved outcome.
- Develop a simple curriculum training. One example is to train the agent to first follow the ball and then to hit the ball.